How to Design an Effective Laserfiche Document Template
A field stores information about a particular Laserfiche entry (document or folder). It is possible to apply fields to specific entries by using templates, which are collections of related fields. An entry can only have one template assigned to it, but each template can contain multiple fields. This article outlines how to create a Laserfiche template that includes different field types, multi-value fields, dynamic fields, and field constraints.
To demonstrate how to create a Laserfiche template, I will use the fictional example of Laser University.
Example: Laser University
As part of Laser University’s admissions process, prospective students have to submit an application along with the following supplemental documents:
- Personal statement.
- Candidate recommendation.
- Transcript.
All of these documents are scanned into Laserfiche with Laserfiche Scanning or printed into Laserfiche with Laserfiche Snapshot and stored in the applicant’s folder in the Laserfiche repository.
Laser University’s admission officers agreed on the following parameters to organize submitted applications and documents. The officers based this list on the information that they would need when searching for applications and related documents.
- First and last name.
- Date of birth.
- Proposed major of study.
- Phone number.
- E-mail address.
- GPA.
- SAT score.
- Type of degree.
- State of residency.
- Type of student (new student or transfer student).
- Type of document.
Here is how Laser University converted these items into a template that is applied to every application and related document in the Laserfiche repository.
Types of fields
Different field types can contain a different type of information. Some examples of field types include:
- Text fields.
- Number fields.
- Date fields.
- List fields.
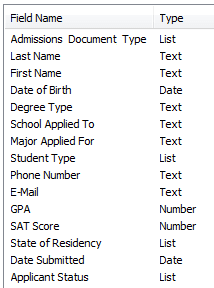
Each field type can be used for a separate purpose. Here is a list of all of the fields in the Laser University “Admissions Application” template and their field types.
Multi-value fields
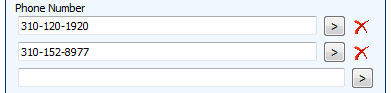
Sometimes, it would make sense if one field was able to contain more than one value. For example, prospective students can have more than one phone number such as a home phone and a cell phone. To account for this, Laser University can create two different fields: one for cell phone and one for home phone. Two fields would make searching by phone number very inefficient, though, since the admissions officer would not know which of the fields to search because one of them could be null.
A better option would be to create a multi-value phone number field to store either one or both phone numbers. Most fields can be set to contain multiple values and the number of values assigned to such a field varies from entry to entry, depending on user input.
Therefore, Laser University can make one field for “Phone Number” and then set it to allow multiple values. An admissions clerk can then add as many phone numbers as necessary into the field. When searching for an applicant’s document by phone number, an admissions officer can simply perform a single search using whichever phone number he has in front of him.
Field constraints
Using a multi-value field for the phone number can make searching for prospective applicants by phone number simpler, but if phone numbers aren’t entered in a consistent format (xxx-xxx-xxxx vs (xxx)xxx-xxxx), this searching will still be difficult. This is where field constraints fit in.
Field constraints restrict users to enter data that fits a particular pattern or is of a particular type. To make it easier for admissions officers to locate documents related to a particular applicant, the administrator can set field constraints on the phone number field. All phone numbers will have to follow this format: xxx-xxx-xxxx. This field constraint can be set with regular expressions.
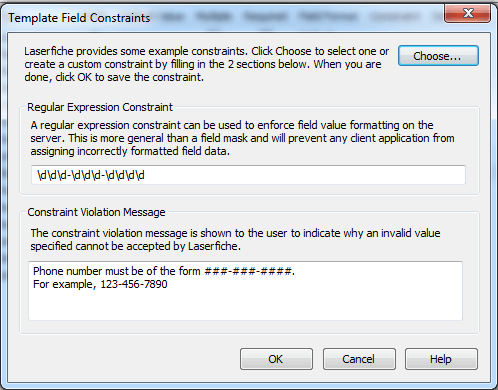
When a user opens the “Admissions – Application” template, he will now see that the phone number field contains two dashes. These dashes signify that a user will not be allowed to enter a phone number in any other format (such as adding parenthesis).
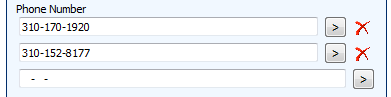
Since all phone numbers are now formatted uniformly, searching by phone number will now be easy.
In addition to field constraints, fields in a template can be designated as “required.” Required fields prevent a user from saving the document without filling them out first. Laser University designated the following fields to be required because they are all used in naming the final documents:
- Admissions document type.
- Last name.
- First name.
Required fields are configured in the Laserfiche Administration Console by simply checking a box.

Dynamic fields
Sometimes, list fields may contain so many different values that it is difficult for the admissions clerk to select the one he needs. For example, since there are over 100 different majors at Laser University, it is time consuming to select just one from a list field that contains them all.
Selecting a particular item from a list field can be simplified by using dynamic fields. Dynamic fields allow a user to be presented with options to select in one field, based on what he had previously selected in another field. Dynamic fields look up information in an external SQL database table and use this to filter the results.
Laser University has set up a series of dynamic fields to help with populating the “School Applied To” and “Major Applied For” fields. For this purpose, the university used an existing database table.
Laser University’s existing external database table looks like this:

In the table pictured above each degree type has associated schools and majors. These relationships have been used to set up the dynamic fields.
When configuring these fields in the Administration Console, the “School Applied To” field is assigned one parent field – the “Degree Type”, and the “Major Applied For” is assigned two parent fields – “Degree Type” and “School Applied To.”
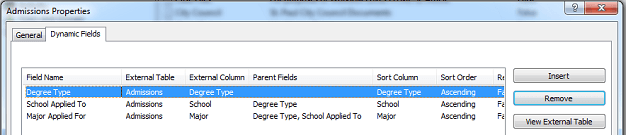
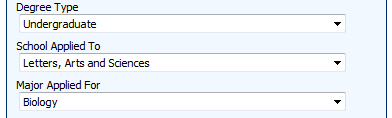
When filling out this template, the admissions clerk will first select a degree type from the “Degree Type” list field. This field will contain a list of all the degree types that are specified in the external database table. Next, the admissions clerk will select the correct school from the “School Applied To” field. The choices in this field are limited to those schools that accept the degree just specified. Once the admissions clerk selects a school, the “Major Applied For” field will be restricted to only those majors that satisfy the degree type and particular school.
For example, if the admissions clerk selects the undergraduate degree type, then the schools listed in the “School Applied To” field are only schools that provide an undergraduate degree (the law school will not be listed since that school only provides graduate degrees). Once the clerk selects the Letters, Arts and Sciences school, the majors listed in “Major Applied For” will only be those that are offered at the school, and for which a student can get an undergraduate degree (mechanical engineering will not be listed, as that major is located in the School of Engineering).
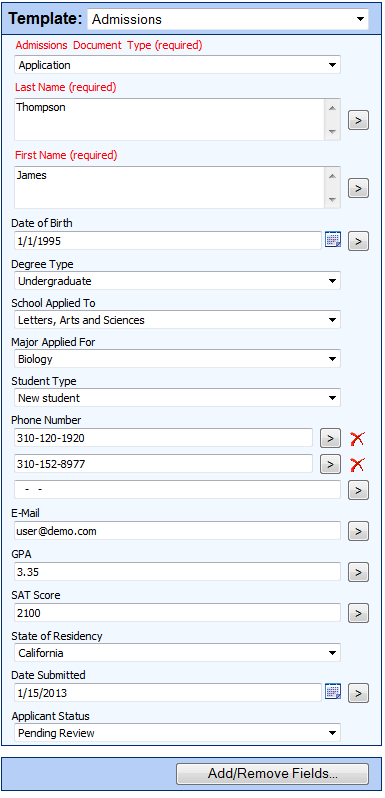
Final template
Here is what the final, populated template looks like:
Best practices for using templates and fields
Administrators should keep the following best practices in mind, when setting up fields and templates.
- Reuse fields across templates. If many templates should have a “Last Name” field, then create one field and apply it to the multiple templates. This simplifies searching by allowing a user to find all student records for a person with the last name of “Smith” without having to worry about which template to search in.
- List fields, dynamic fields and field constraints can help reduce errors due to data entry or spelling mistakes. This will also make documents easier to search for in the repository.
- When creating templates, think of all the different things that an end- user would want to search on and include those as template fields.